Drafting a decision
After all the work of evaluating a manuscript, writing and sending the decision letter to the author is the final hurdle to clear.
If you'd like to collaborate on that work with your fellow editors to get a group consensus on how to phrase your feedback or if you simply want to start writing the decision letter and come back to finish it later, then the decision draft functionality in your Scholastica account will be essential!
- Configuring who can draft and send decisions to authors
- Creating a decision draft
- Writing a decision draft
- Draft status (optional)
- Auditing who made changes to a decision draft
- Sending a decision
Configuring who can draft and send decisions to authors
While some journals have a flat organizational structure where every editor does a little bit of everything, others find it important to be able to appoint specific duties to specific editors.
If your editorial team structure includes ensuring that only particular editors have the ability to draft and to send decisions, you can set those permissions in your account so that only the desired team members can take those actions.
Your three options for permissions are:
- Editor can draft decisions and can send them to the author
- Editor can only draft decisions, but cannot send them to the author
- Editor can neither draft decisions, nor can send them to the author
Creating a decision draft
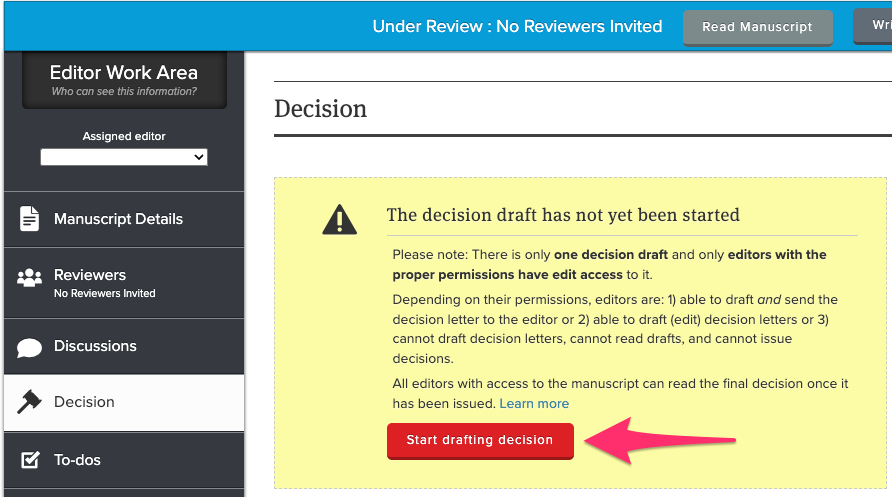
If you have viewing permissions for a given paper and permission to draft a decision, you can start the decision draft by navigating to the manuscript work area, clicking "Decision" in the Editor Work Area toolbar on the left, and then clicking "Start drafting decision".
Note: There is only one decision draft per manuscript. Once an editor has started drafting a decision, any other editors with permission to draft decisions can view and edit that same, shared draft until it has been finalized and sent to the author.
Writing a decision draft
Overview
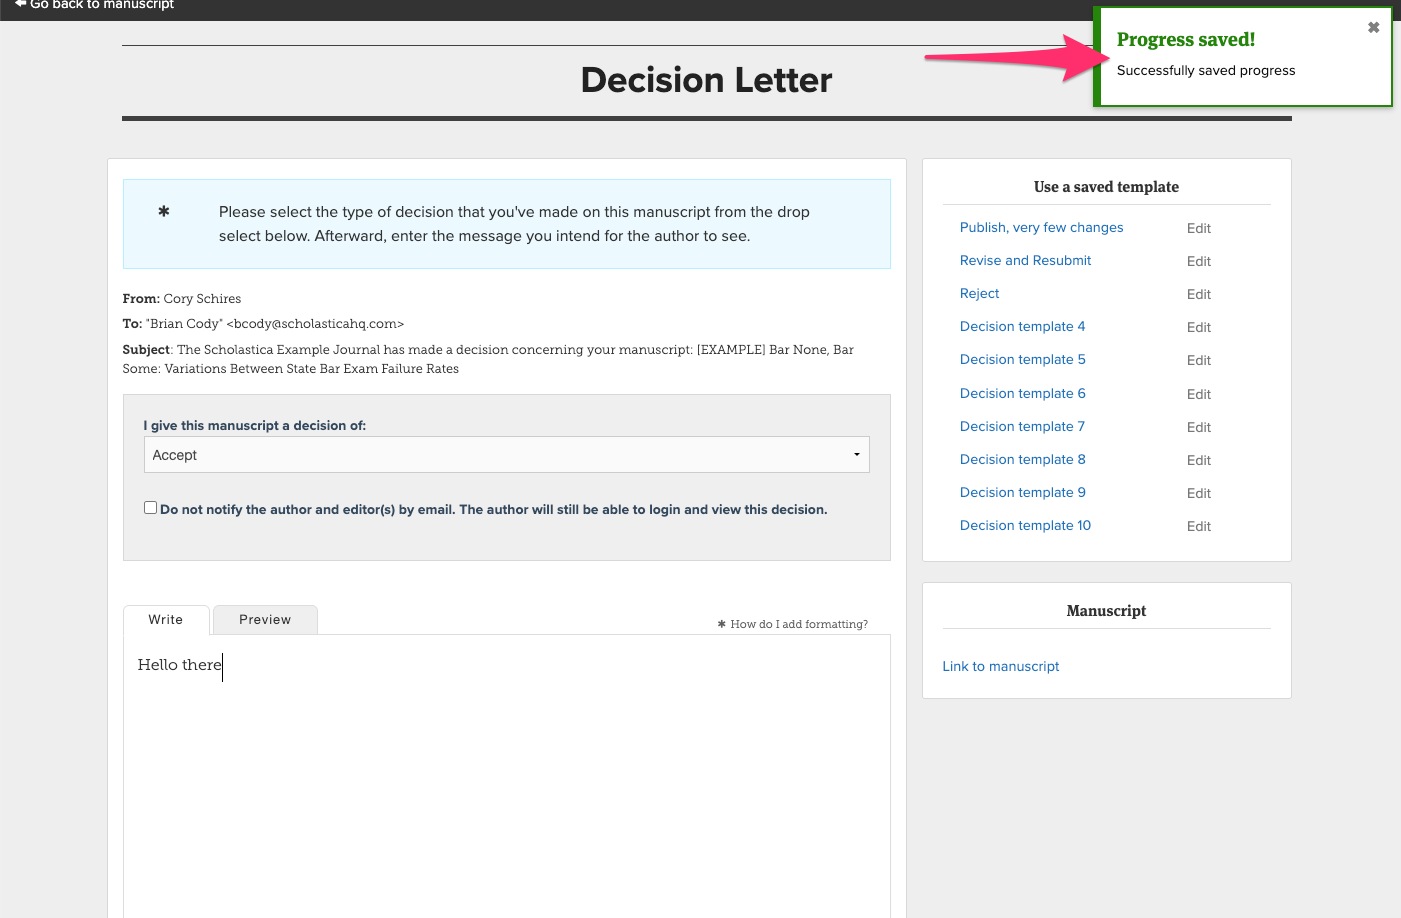
Once a decision draft has been started, editors with permission to draft may open, view, and edit the decision draft by clicking "Draft" on the Decision page. Friendly reminder: The draft is shared across your editorial team (if their accounts have been configured with "draft decision" permission) and is not your personal decision draft.

Saving the draft
As you make changes to the draft by editing the decision letter, selecting a decision type from the dropdown, etc. the draft will automatically save a few moments after you've made that edit.
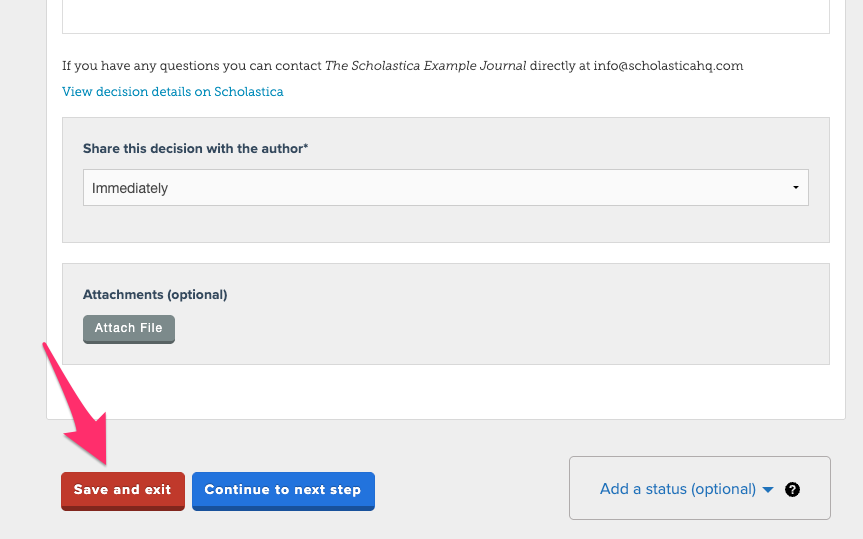
You can also always manually save your draft by scrolling down and clicking "Save and exit".
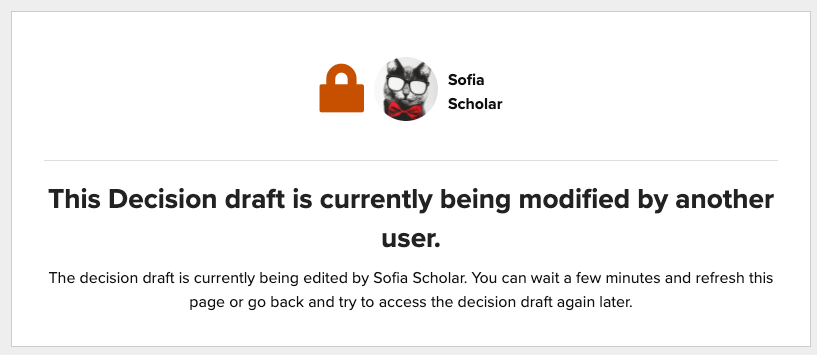
Can multiple editors work on a draft simultaneously?
Only one editor at a time may have the decision draft open. If another editor is currently viewing the decision draft and you try to access that page, you'll see an alert notifying you of the editor who is currently working on the draft.
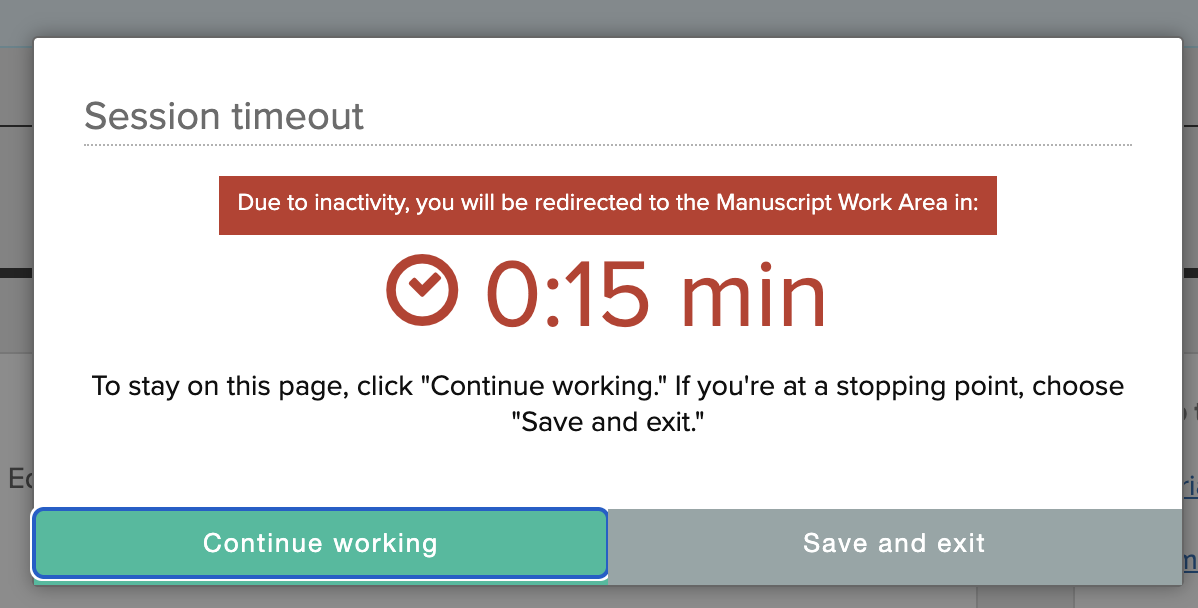
To ensure that decision drafts are never permanently "locked" by a user, once the editing user has been idle in the draft for 10 minutes, their editing session will timeout and they'll be redirected.
Another editor can then access the draft decision and make any desired edits.
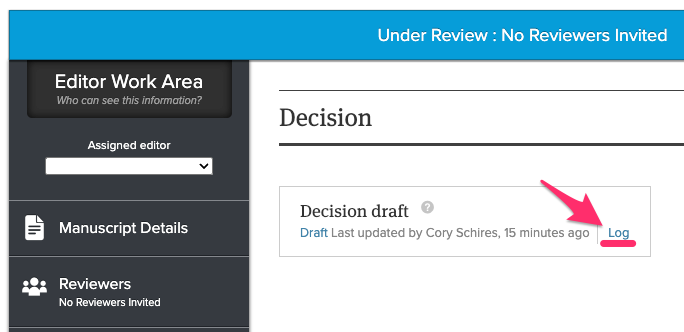
Auditing who made changes to a decision draft
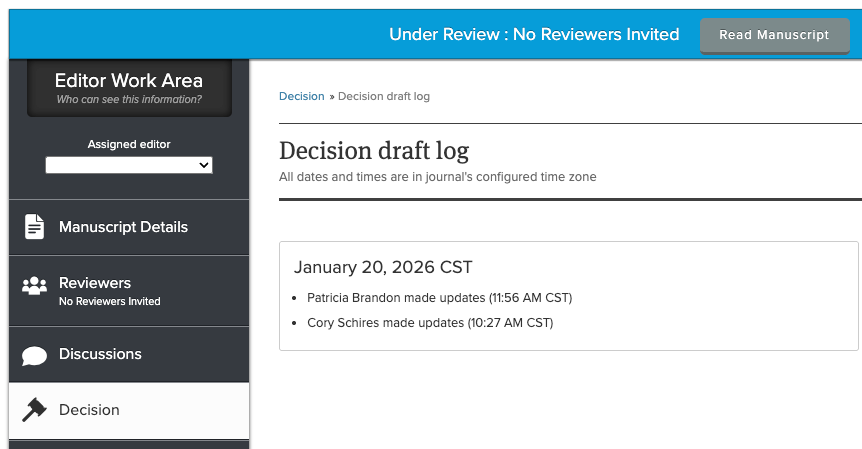
To see the history of who edited the decision draft and when, just navigate to the Decision page for a manuscript and click the hyperlinked "Log" text. In the log, you'll see the name of the editors who made changes as well as the dates and times of their work. You will not see a full change history and there is no way to go back to a previous version of the draft.
Draft status (optional)
- Setting a draft status
- Where the draft decision status appears
- Optionally alerting editors by email of draft status updates
Setting a draft status
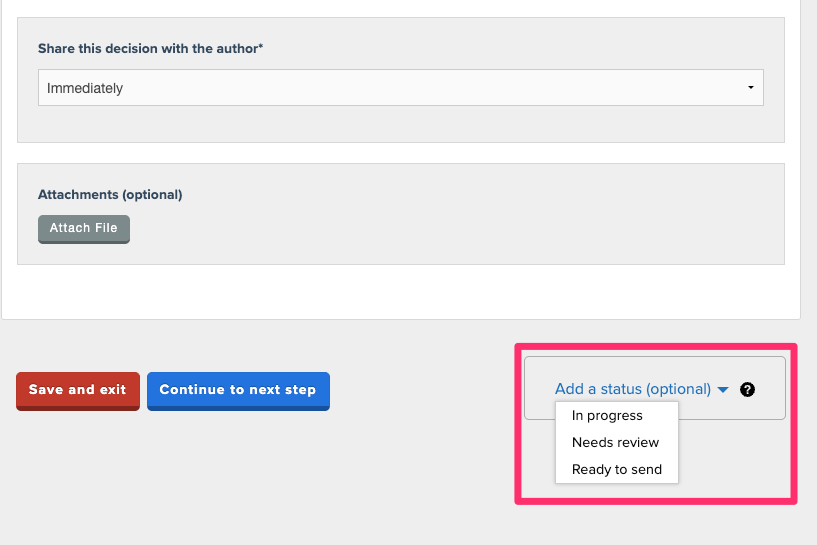
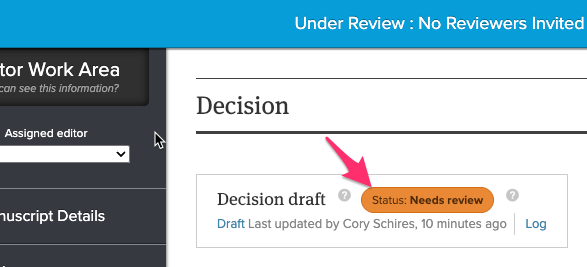
You can help your editorial board coordinate internally on whether a decision is ready to send, in progress, or needs review by adding a status to a decision draft.
To add a status, just open the draft, scroll to the bottom of the first page, and click the "Add a status" dropdown.
Please note: The status tool is a communication and internal coordination tool. It's up to you and your team to decide if you want to use it, what each status means for you, and how and when you'd like to proceed with sending a draft.
No functionality is enabled or disabled based on the status of a draft.
Where the draft decision status appears
Only editors see anything to do with the draft decision status — it does not show to authors or reviewers at all.
When you've set a status for a draft decision, the status can be seen on the Decision page of the manuscript work area...
...and on the manuscript table, if you've added the "Decision draft" column to your manuscript table columns view.

Optionally alerting editors by email of draft status updates
Once you've selected the appropriate status, you'll be given the chance to optionally send an email alert to fellow editors and can, optionally, also include a custom message with that email alert.
Please note: the email alert is sent from a "noreply" email address, so recipients cannot respond. If you want the editor to follow up with you any further, please direct them to use Discussions to do so.


Sending a decision
Once the decision draft has been fine-tuned and you're ready to issue the decision to the author, any editor who has permission to issue decisions can send the decision.
To send the decision, navigate to the manuscript work area > Decision > Then click "Draft" to open the draft.
Navigate through the draft by clicking the "Continue to next step" button until you reach the "Preview and Confirm Decision" step. Click "Submit decision" to send the decision to the corresponding author.
When the draft has been sent to the author, it is finalized as the actual decision letter.
The draft does not remain as a separate record.
Troubleshooting issues with sending a decision
Are you missing required information?
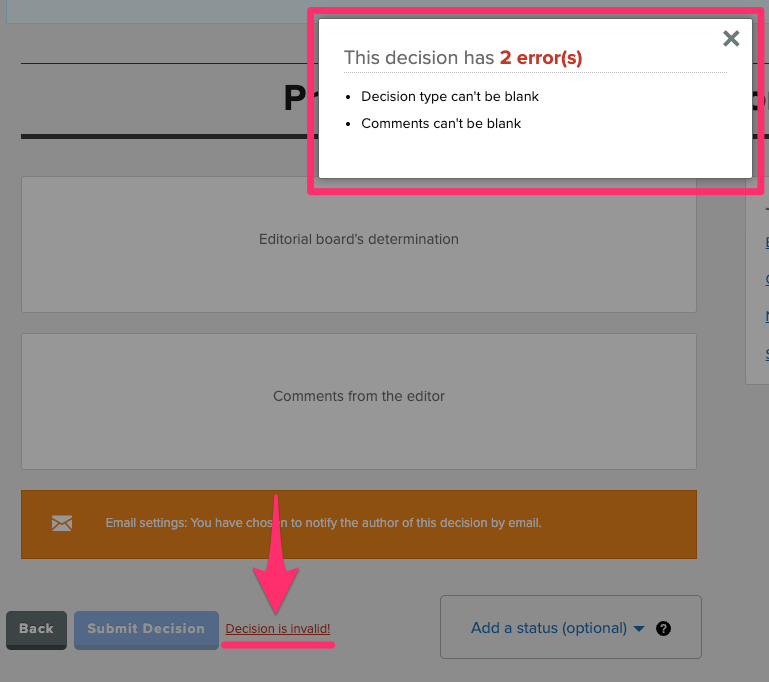
In order to send the decision letter, you must, at a minimum, select the decision type (e.g. Accept, Reject, etc.) and enter at least some text in the decision letter field. If you navigate to the final step of the decision sending process and the "Submit Decision" button isn't selectable, click the "Decision is invalid!" hyperlinked text to the right of the button. When you click that text, a pop-up will appear with the details of which fields still need to be completed.
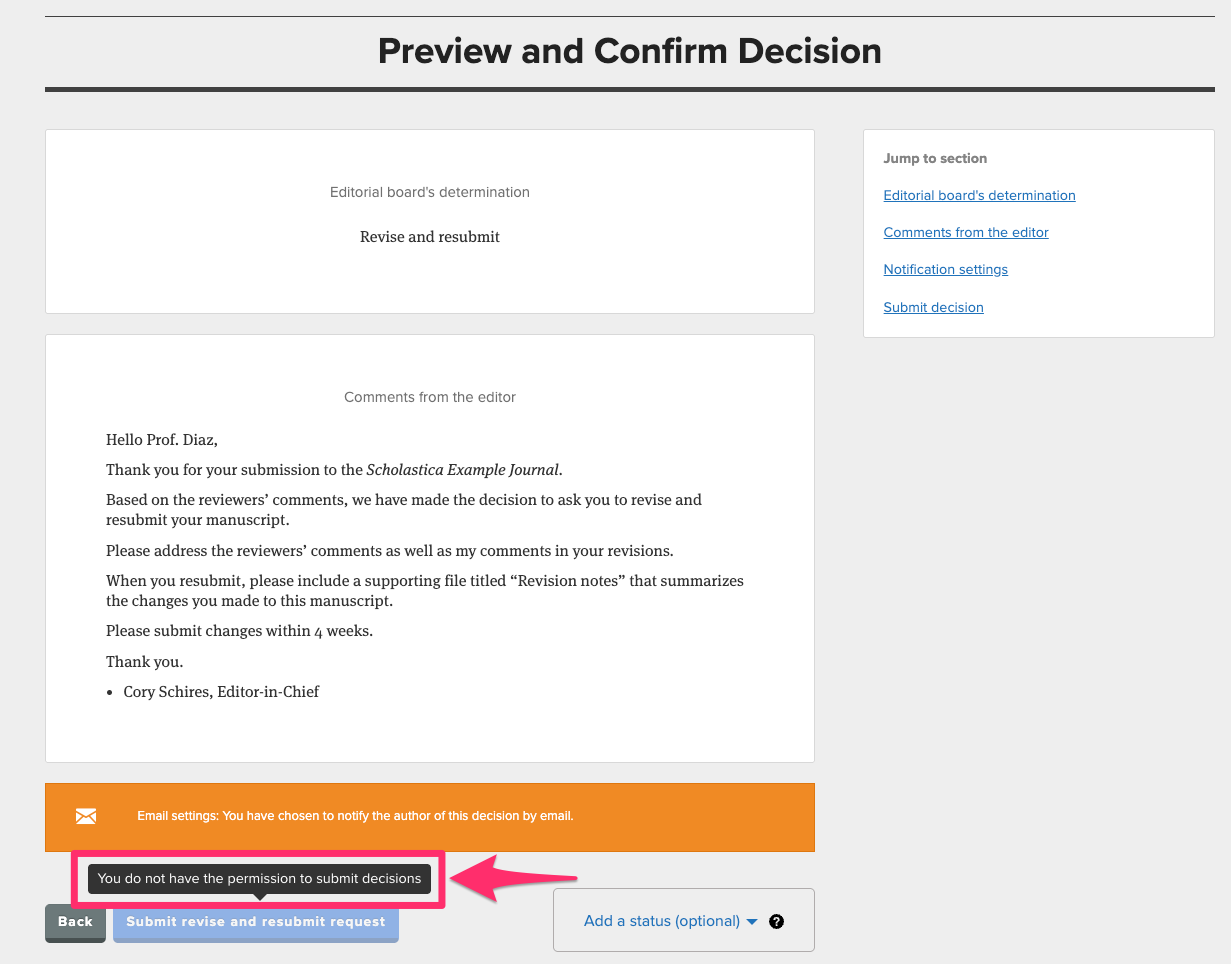
Do you have permission to issue decisions?
There are three levels of permissions around decisions: may neither draft nor issue decisions, may only draft decisions, and may draft and issue.
If you can see, access, and edit the decision draft, but cannot click the Submit button, when you hover your cursor over the button you should see a tooltip alerting you to your restricted permissions:
If you feel that the permissions aren't set correctly for your account, you can contact your journal's admin editor to ask them to adjust your decision-issuing permissions by following the steps found here.