Editor Guide
Are you an editor for a law review? We have a guide specifically for you here.
Overview of being an editor
As an editor, you will be able to receive, organize and assign submitted articles to your editorial team using Scholastica's tags, filters and notifications. You can easily add files and manage versions of manuscript files all in one place.
To learn how to do all that and more, please read the guide below.
Table of Contents
1. How to get started - Setting up your journal account
Scholastica makes creating a journal painless. Setup is quick and stress-free; all settings can be changed later. Follow the steps in this help doc to get started : Creating a Journal Account on Scholastica
Add editors
Editors assist in managing your journal. They have many of the same privileges as journal admin users, such as reading manuscripts and inviting reviewers.
Editors cannot manage or change a journal's payment information or grant editorial privileges to other users. Only journal admin users can make these changes.
- To invite your team to Scholastica, the admin editor of your journal's Scholastica account will go to My Journals > Settings > Manage Editors then click “Invite New Editor”.

Find and invite editors
- Once you've clicked "Invite New Editor":
- Enter the editor's email address in the To field.
- Enter a message inviting them to become an editor of your journal.
-
Click Send Invitation.
Now you'll set the permissions for each editor to ensure they have access to the papers that are appropriate for them and you'll also choose the editor's decision permissions. The three levels of viewing permissions are:
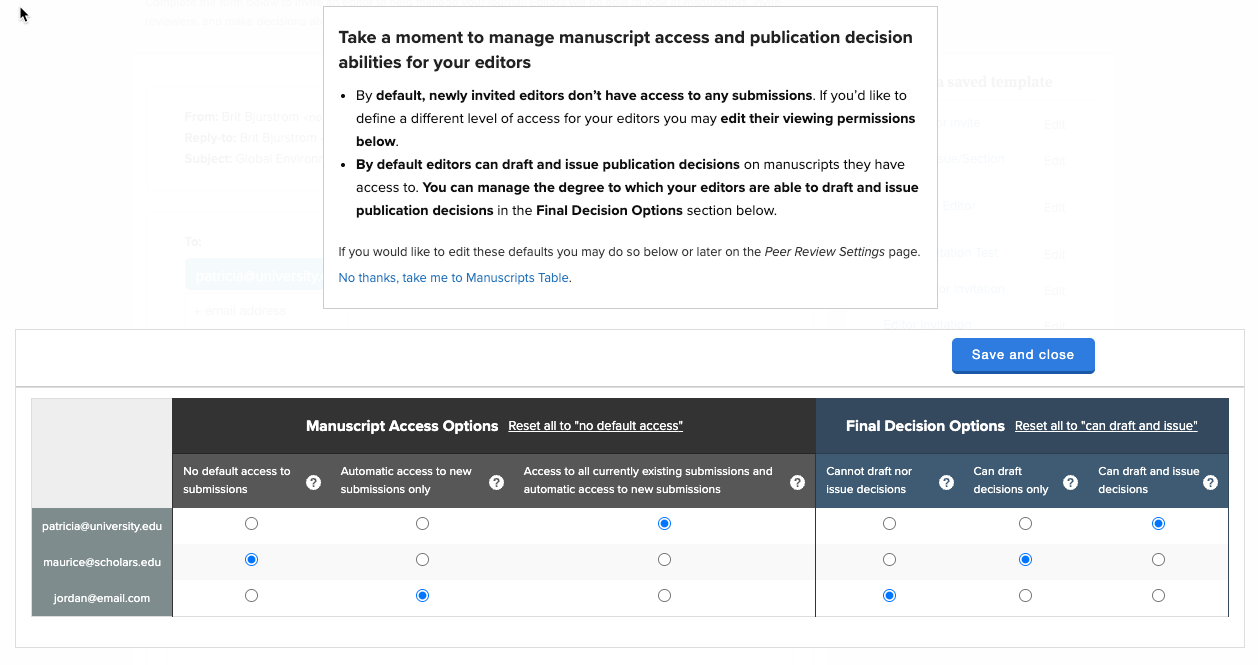
- Manuscript Access Options
- No default access to submissions: Editors set to this level are not granted access to view any manuscripts automatically. You can manually grant access to specific papers on a case-by-case basis for editors with this level of permission.
- Automatic access to new submissions only: Editors set to this level are only granted access to manuscripts submitted after this user was invited to gain editor access to the journal account. I.e. Journal A has received 10 submissions in March. Eddie Editor was invited to become an editor on April 1st. A new paper is submitted on April 2nd. Eddie will only have access to the new paper submitted on April 2nd and will not see the previously submitted papers unless manually granted access by another editor.
- Access to all currently existing submissions and automatic access to new submissions: Editors set to this level are automatically granted access to all papers that have ever been submitted to the journal as well as new submissions.
- Final Decision Options
- Cannot draft nor issue decisions
- Can draft decisions only
- Can draft and issue decisions.
- Select the appropriate viewing permissions for each editor and set their decision-making ability, then click Save and close.

Please note: The admin editor can always edit editor manuscript permissions and decision-making ability later under Peer Review Settings > Manuscript Access.
You'll be taken back to the Manage Editors page.
- The editor you've invited has now been added to the list of editors. Their Status will be "Pending" until they accept or decline the invitation.
- You can resend the invitation by clicking "resend invitation" next to the Pending status if they have trouble finding the emailed invitation.
Remove editors
- To remove old editors your law review’s admin editor will:
- Navigate to My Journals > Settings > Manage Editors
- Check the boxes for the editor(s) who should no longer have access to the journal account
- Click the "Actions" dropdown that will appear once you've selected an editor and select "Revoke"

Proxy submissions
Proxy submissions are manuscripts that you have submitted on behalf of an author. You may have created a proxy submission because the author emailed you their submission rather than submitting it directly or because you may be transitioning from your previous journal management system to Scholastica. We strongly recommend that journals DO NOT use proxies for new submissions. Authors should submit their manuscripts themselves.
Uploading a manuscript on behalf of an author generally offers the author a subpar experience because they won't have their own account on Scholastica and therefore can't log in to manage their submission, accept or decline a publication offer, or upload any supplemental files to their submission.
For more information on how to handle proxy submissions, read our guide here: Can I manage a manuscript in Scholastica that I received by email?
2. Journal Settings
Journals on Scholastica are highly configurable. Once you've set up your journal, the Settings tab will be visible to the journal's administrator.
- Journal Administrator
- Email options
- Close submissions to your journal
- Update your journal’s public profile
Journal Administrator
Only the journal's administrator can see and change the journal's settings, and there can be only one administrator at a time. Admin rights can be transferred to any of the journal's other editors.
- From your Dashboard, click My Journals.
- Click the Settings tab.
- Select Journal Settings from the dropdown.
- Click 'Edit" under Transfer Journal Admin Rights
- Select an editor from the pull-down menu.
- Click Update to confirm the changes

Email options
Many actions within Scholastica will generate email notifications. In this section, a journal's administrator can determine which actions send emails and to whom.
- From your Dashboard, click My Journals.
- Click the Peer Review Settings tab.
- Click Email notification settings
- Click "Edit" under the Email Options header
- Click the checkbox next to each recipient for each action.
- Click "Update Journal" to save changes.

Open/close submissions to your journal
You can open and close submissions to your journal in your journal’s Settings.
- From your Dashboard, click My Journals.
- Click the Peer Review Settings tab.
- Click "Edit" under the Open / Close Submissions header.
To OPEN for submissions,
- Click the button "Open submissions."
To CLOSE submissions,
- Enter a message to explain when you’ll next be accepting submissions.
- Click the button "Close submissions."

Update publicly-visible journal information
You should always ensure you have the most up-to-date information available for authors on your Journal Profile. Why? Because authors read the information that you have listed prior to submitting to your journal!
Authors click “Guidelines” to read the information you have posted on your “For Authors” page when they’re preparing to submit.
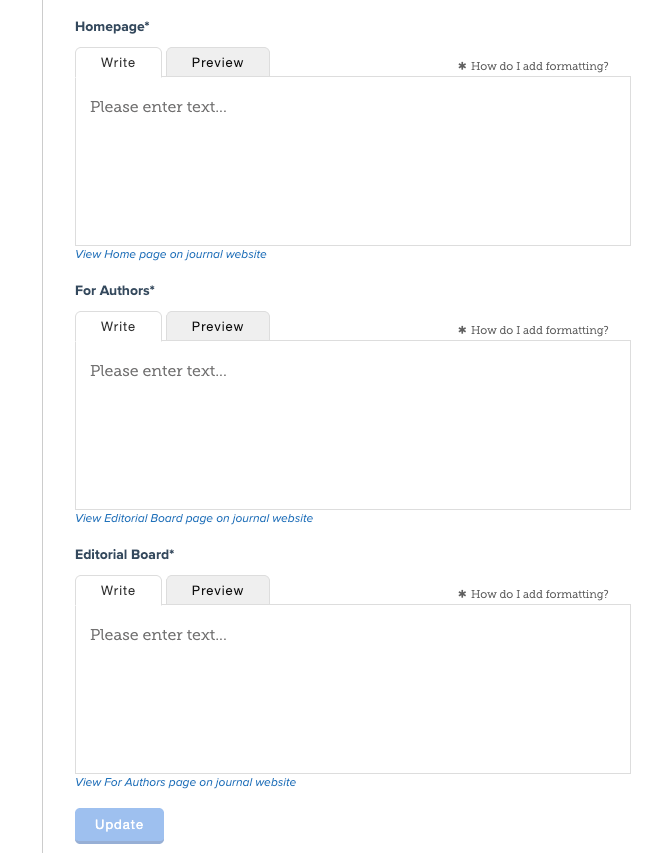
To update your journal profile information (Home, For Authors, Editorial Board)
The admin editor will go to My Journals > Settings > Journal Settings then click edit under "Journal Profile". On that page, they'll just scroll down to the Homepage, For Authors, and Editorial Board text areas to make changes to the text before clicking "Update Journal" to save their changes.
Please note: If you're using Scholastica OA Publishing, you'll instead follow these steps to customize your Scholastica journal site.
3. Manage manuscripts
This section gives an overview of how Scholastica helps editors organize, access, and take action on manuscripts submitted to their journal. For more information on creating and saving custom manuscript table views, please read more here: Manuscript table.
- View all manuscripts
- Filter manuscripts
- Search manuscripts
- Sort manuscripts
- Tag manuscripts
- Discussions
View all manuscripts
- From your Dashboard, click My Journals.
- Select the Peer Review tab
- Click the Manuscripts tab.
- By default, the list of manuscripts will be sorted by submission date with the most recent at the top.
- Read more: What does the manuscript status mean?
- Read more: Can I hide a manuscript from another editor?
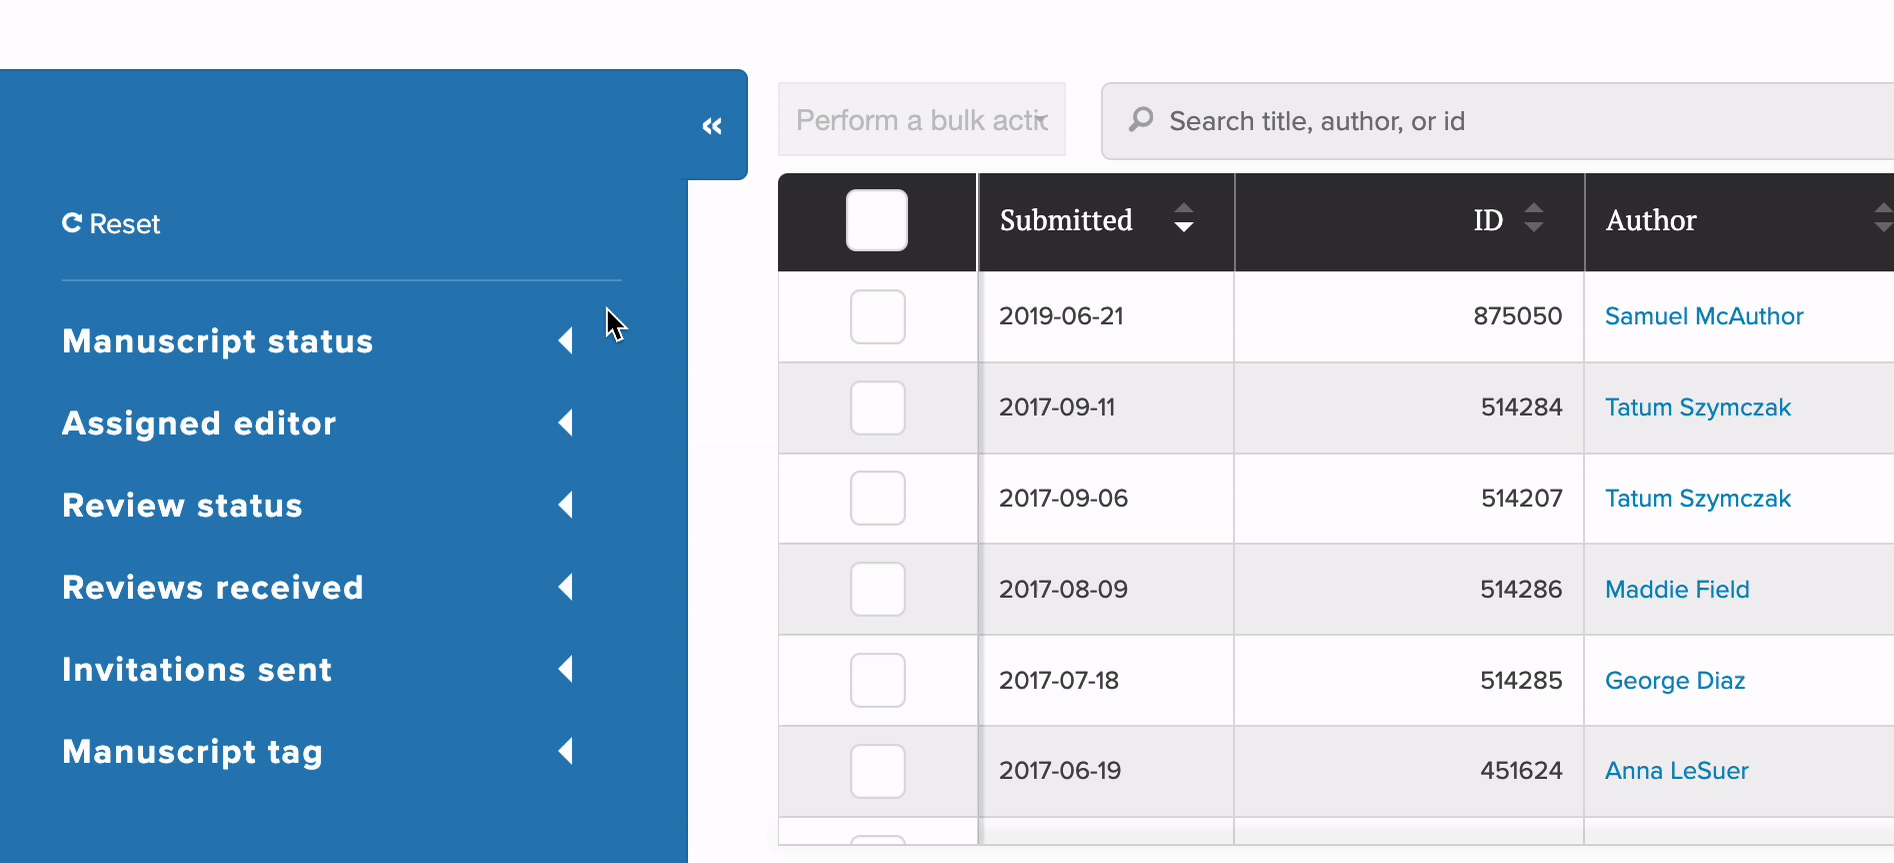
Filter manuscripts
- Manuscripts can be filtered by their status, review condition, and which editor they are assigned to.
- By default, no filters are applied and all manuscripts are displayed.
- The manuscript status field can be set to under review, conditionally accepted (only appears if you've created a conditional accept decision type), accepted, rejected with reviews, desk rejected, withdrawn, revise & resubmit, revise & resubmit (pending), and revise & resubmit (late).
- Note: Conditionally accepted and the R&R sub-statuses only appear for non-law-review journals.
- The assigned editor field can be set to no one, or to individual editor(s).
- The review status field can be set to late responses or reviews, pending reviews, unanswered invitations, target # of reviews submitted, and fewer than target # of active reviewers.
- Note: The last two options only appear for journals with the target number of reviews setting enabled.
- The reviews received field can be set to 0 reviews, 1 review, 2 reviews, 3+ reviews.
- The invitations sent field can be set to no reviewers invited, 1-5 invitations, 6-11 invitations, and 12+ invitations.
Search manuscripts
- Manuscripts can be searched using the search bar.
- Type a query like an author's name, a manuscript's title, or tags; the manuscript table will automatically update to accommodate your search.
- Read more: Advanced Search
Sort manuscripts
- Manuscripts can be sorted by clicking any column header.
- To sort by any of these fields, click the top of their respective column.
- Click the column again to reverse the order.
Tag manuscripts
- Use the side panel to filter by a particular manuscript tag at a time and to see all other manuscripts with that tag.
- Read more:
Discussions
Each manuscript has a Discussions section in the Editor Work Area in which editors can communicate with other editors, reviewers assigned to the manuscript, or the primary author (they can also contact you):

Message recipients receive an email notification of the message and can respond via email. To learn more, read How do discussions work?
Your journal can also be contacted via the publicly listed email address on your Journal Profile page:

Messages from authors will come as emails to the journal's administrative email address. You can check or change this email address:
- From your Dashboard, click My Journals.
- Click the Settings tab.
- Select Journal Settings from the dropdown
- Click 'Edit' under Journal Profile
- Messages go to the email address in the "Email" field.
4. Manage reviewers
Scholastica helps you invite reviewers, and gives you tools to manage your reviewer deadlines. You can customize your reviewer feedback form, and use the built-in reviewer metrics to improve your reviewer workflow over time.
Reviewer form
When you invite reviewers to provide feedback on a manuscript, they'll receive a form along with the manuscript. The Reviewer form structures the reviewer's feedback for editors and can be customized for your journal. Learn how here.

Default Reviewer Form
Invite reviewers
Reviewers can be invited from within Scholastica - whether they're already using it or not.
- From your Dashboard, click My Journals.
- Make sure you're in the Peer Review section
- Click the Manuscripts tab.
- Click the manuscript that you need reviewed.
- In the Editor Work Area, click Reviewers.
- Click Invite Reviewer.
- You can choose from your past reviewers. This list includes reviewers that have written a review for you on Scholastica previously as well as reviewers whose information you've imported into Scholastica. You'll be able to see a quick overview of last invited date, current number of active reviews, and more for the reviewers who have written a review for you on Scholastica previously.
- Search or browse to the reviewer you want.
- Click Invite to Review.
- You can choose from among all Scholastica Users.
- Click All Scholastica Users.
- Search or browse to the reviewer you want.
- Click Invite to Review.
- You can choose a non-Scholastica user.
- Click Non-Scholastica User.
- Enter the reviewer's email address.
- Enter a message for the reviewer.
- Click Send Invitation.
- An email will be sent with information about the manuscript and the potential reviewer will be able to accept or decline the invitation. A Discussion message will also be created to record the invitation that was sent. If the invited reviewer responds to the invitation email directly, their response will be recorded in the Discussion message thread.
- Read more:
- Can I import my past reviewer data?
- What happens after a reviewer invitation is sent?
- Can I configure my journal to hide the manuscript file from reviewers until they accept the invitation?
- Can I send reviewer reminder emails?
- How much of a review will the manuscript author see?
- Can I submit a review on behalf of a reviewer?

Invite reviewers and read reviews in the manuscript work area
Reviewer invitation templates
If you'd like to make inviting reviewers quicker and easier for you and your team, you can use reviewer invitation templates to do so.
Your journal account has space for your editorial team to create up to 10 templates that you can then use to invite reviewers to your manuscripts. Just navigate to an 'under review' manuscript, click Reviewers then click Invite Reviewer and either select an existing user or navigate to non-Scholastica user. Once on the reviewer invitation letter page, just click "EDIT" to create a new template letter that all of your editorial team can view and use.

Give your template a name like, "Managing Editor's template" or "Special Issue Reviewer Invite" and fill in the body of the invitation letter itself. Not sure what to write? Feel free to build off of our example template here.

When you're ready to use your template invitation letters, simply click the name of the template you've created to populate the form with your prewritten text, then customize the letter as needed before sending it to your potential reviewer.
Read reviews
Editors can instantly see the feedback provided by reviewers.
- From your Dashboard, click My Journals.
- If a manuscript has reviews, a rating will appear in the "Rating" column.
- Click a manuscript with reviews.
- In the Editor Work Area, click Reviewers.
- If an invited reviewer has accepted the invitation and submitted a review, their "Status" will be "Accepted Review Submitted"
- Click read review.
Edit reviewer deadlines
You can edit reviewer deadlines directly from the manuscript work area. When you change a deadline, the reviewer is automatically notified by email.
- From your Dashboard, click My Journals.
- Make sure you're in the Peer Review section
- Click the Manuscripts tab.
- Find the manuscript that needs a revised review deadline.
- Click the manuscript.
- In the Editor Work Area, click Reviewers.
- Next to the deadline you want to change, click edit.
- Select the new date and click to save your changes.
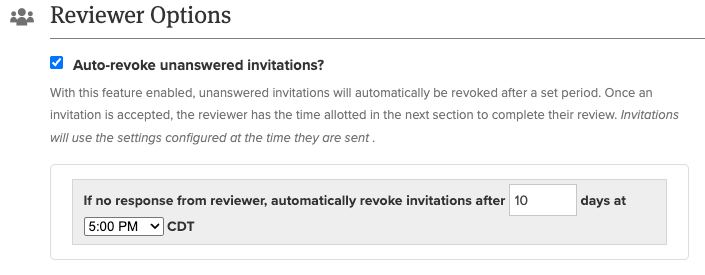
- There are two types of deadlines you may see depending on the invitation's status and the your journal's reviewer option configurations:
-
Deadline to accept invitation — the date by which the reviewer must accept or decline the invitation. This only appears if your journal has the "Auto-revoke unanswered invitations" setting enabled (under Peer Review Settings > Reviewer Options and pictured below).
- Review deadline — the date by which the accepted reviewer must submit their review.
-

Reviewer metrics
Editors can learn about scholars who have reviewed manuscripts for their journals
- From your Dashboard, click My Journals.
- Make sure you're in the Peer Review section
- Click the Reviewers tab.
- By default, reviewers are sorted by name.
- Click a reviewer to see their history of reviews for your journal.

Reviewer table and data

Individual reviewer details for the journal
5. Make decisions
Scholastica provides tools to help editors communicate the journal's final publication decision to authors. Scholastica also includes tools to manage the after-decision workflow (when applicable), such as with revise and resubmit decisions.
Make decisions
Once you've gotten sufficient feedback and are ready to make a publication decision about a Manuscript, Scholastica allows you to give the manuscript a decision and notify the author of said decision.
Scholastica assumes that once a decision is made, any additional reviews are moot since they cannot impact the final decision. When a manuscript is no longer under review, reviewers with pending or accepted invitations are automatically emailed that their invitation has expired and no further action is needed.
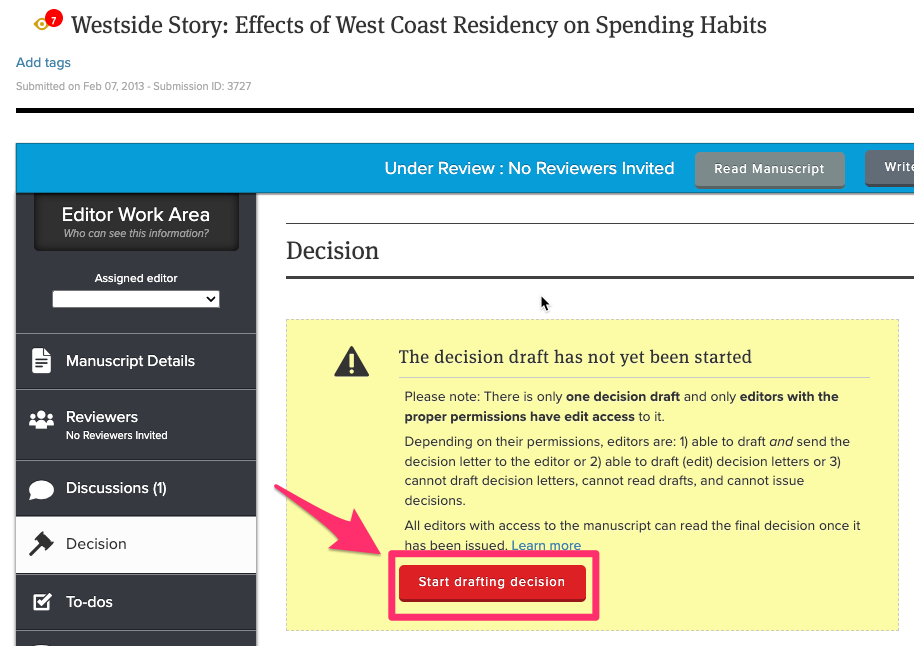
To make a decision:
- From your Dashboard, click My Journals.
- Click the Manuscripts tab.
- Select the manuscript.
- Click "Decision" under the Editor Work Area
- Then click "Start Drafting Decision" (learn more about decision drafts here)
- Enter decision details.
- From the drop select, choose the decision you'd like to issue to the author.
- Enter a message to the author either by typing a new one, or by selecting from your saved decision letter templates.
- Select whether the decision should be shared with the author immediately, in 2 days, or in 5 days (this "delayed decision" option is commonly helpful for journals issuing desk rejections shortly after a submission was received) and if an email should be sent to the author.
- Attach any necessary files to the decision (reviewer notes, final edits, etc.)
- Click "Submit decision" (NOTE: the decisions are final and cannot be undone).
- If you're issuing a decision of Accept, but will still need the author to make minor tweaks, copy-edits, or changes prior to publication, we recommend instructing your authors in your decision letter to send you their updated, post-Acceptance files via Discussions.
- Read more:

Making decisions in the manuscript work area
Decision templates
Since the messages that accompany decisions are often very similar, Scholastica allows editors to create message templates that will automatically fill in the author's name and article information when making a decision.
- On the Make Publication Decision page, use a saved message template by clicking its name.

Decision templates on the Make Publication Decision page
- Edit a saved template by clicking the small pencil icon.
- Make a new template by clicking the small pencil icon next to an unnamed decision template.
- Use merge tags to include dynamic information in your template.
- Scholastica will automatically fill in those values for a given manuscript.
- Click Save changes and close.

Editing decision templates
Editing reviews before sharing with authors
Sometimes reviewer feedback can be harsher than it is helpful and constructive. If you have customized your review form to include fields that are visible to authors, then you will have the chance to "clean up" those overzealous reviews before they're shared with the author.
Reviews are never shared with the author until after a decision is made. To edit the review(s) before they are shared with the author, you'll just click "Make a Decision", fill out the decision letter as normal then click "Continue" at the bottom.
If you do not see "Continue" and just see "Submit Decision", then your reviewer form does not include any information that is visible to authors, so authors will only see the decision letter.

Editing reviews before sharing them with authors

6.Analytics
Scholastica offers editors a powerful suite of infographic-style analytics for insight into the review process.
Read more about Peer Review Analytics on Scholastica here and Publishing Analytics on Scholastica for our OA Publishing users.
7. Publish articles and issues
Scholastica allows you to publish articles individually, or to group them into an issue. You can view an example issue here.
Learn more about how to publish here.
Related Articles
- How do I become an editor of a journal that's already on Scholastica?
- What journal type does my journal fall under?
- Billing on Scholastica
- Can I charge authors an additional submission fee?
- Do you support single blind or double blind journals?
- Does Scholastica support Open Access?
- Can I import data from my previous peer review software?
- Can Scholastica be used for undergraduate journals?
- Do I own the copyright of my journal?